Why You Should Start Using Procreate: The Ultimate Digital Art App for Creatives

Procreate is a powerful and versatile digital art app that offers a wealth of features and tools for artists of all levels. Whether you’re a professional artist, hobbyist, or just starting out, Procreate has something to offer everyone. In this blog post, we’ll explore some of the reasons why you should start using Procreate and what makes it a must-have tool for creative professionals.

  1. Intuitive User Interface

One of the biggest advantages of Procreate is its intuitive and user-friendly interface. The app is designed to make it easy for artists to get started and to quickly create professional-looking artwork. All of the tools are organized in an easy-to-navigate manner, making it simple to find what you need when you need it. The interface also includes customizable gestures and shortcuts, allowing you to streamline your workflow and work faster.

  1. Wide Range of Tools and Brushes

Procreate offers a vast selection of tools and brushes, including pencils, pens, watercolors, and more. Each brush is highly customizable, allowing you to adjust the size, opacity, and pressure sensitivity to create the exact look you’re after. Whether you’re working on fine-tuned details or large, sweeping strokes, Procreate has the tools to get the job done.

  1. High-Quality Output

Procreate is designed to deliver high-quality output, no matter what type of artwork you’re creating. With support for up to 8K resolution and an advanced color management system, you can be confident that your artwork will look stunning and professional. Procreate also supports multiple file formats, making it easy to export your artwork for use in other applications or for print.

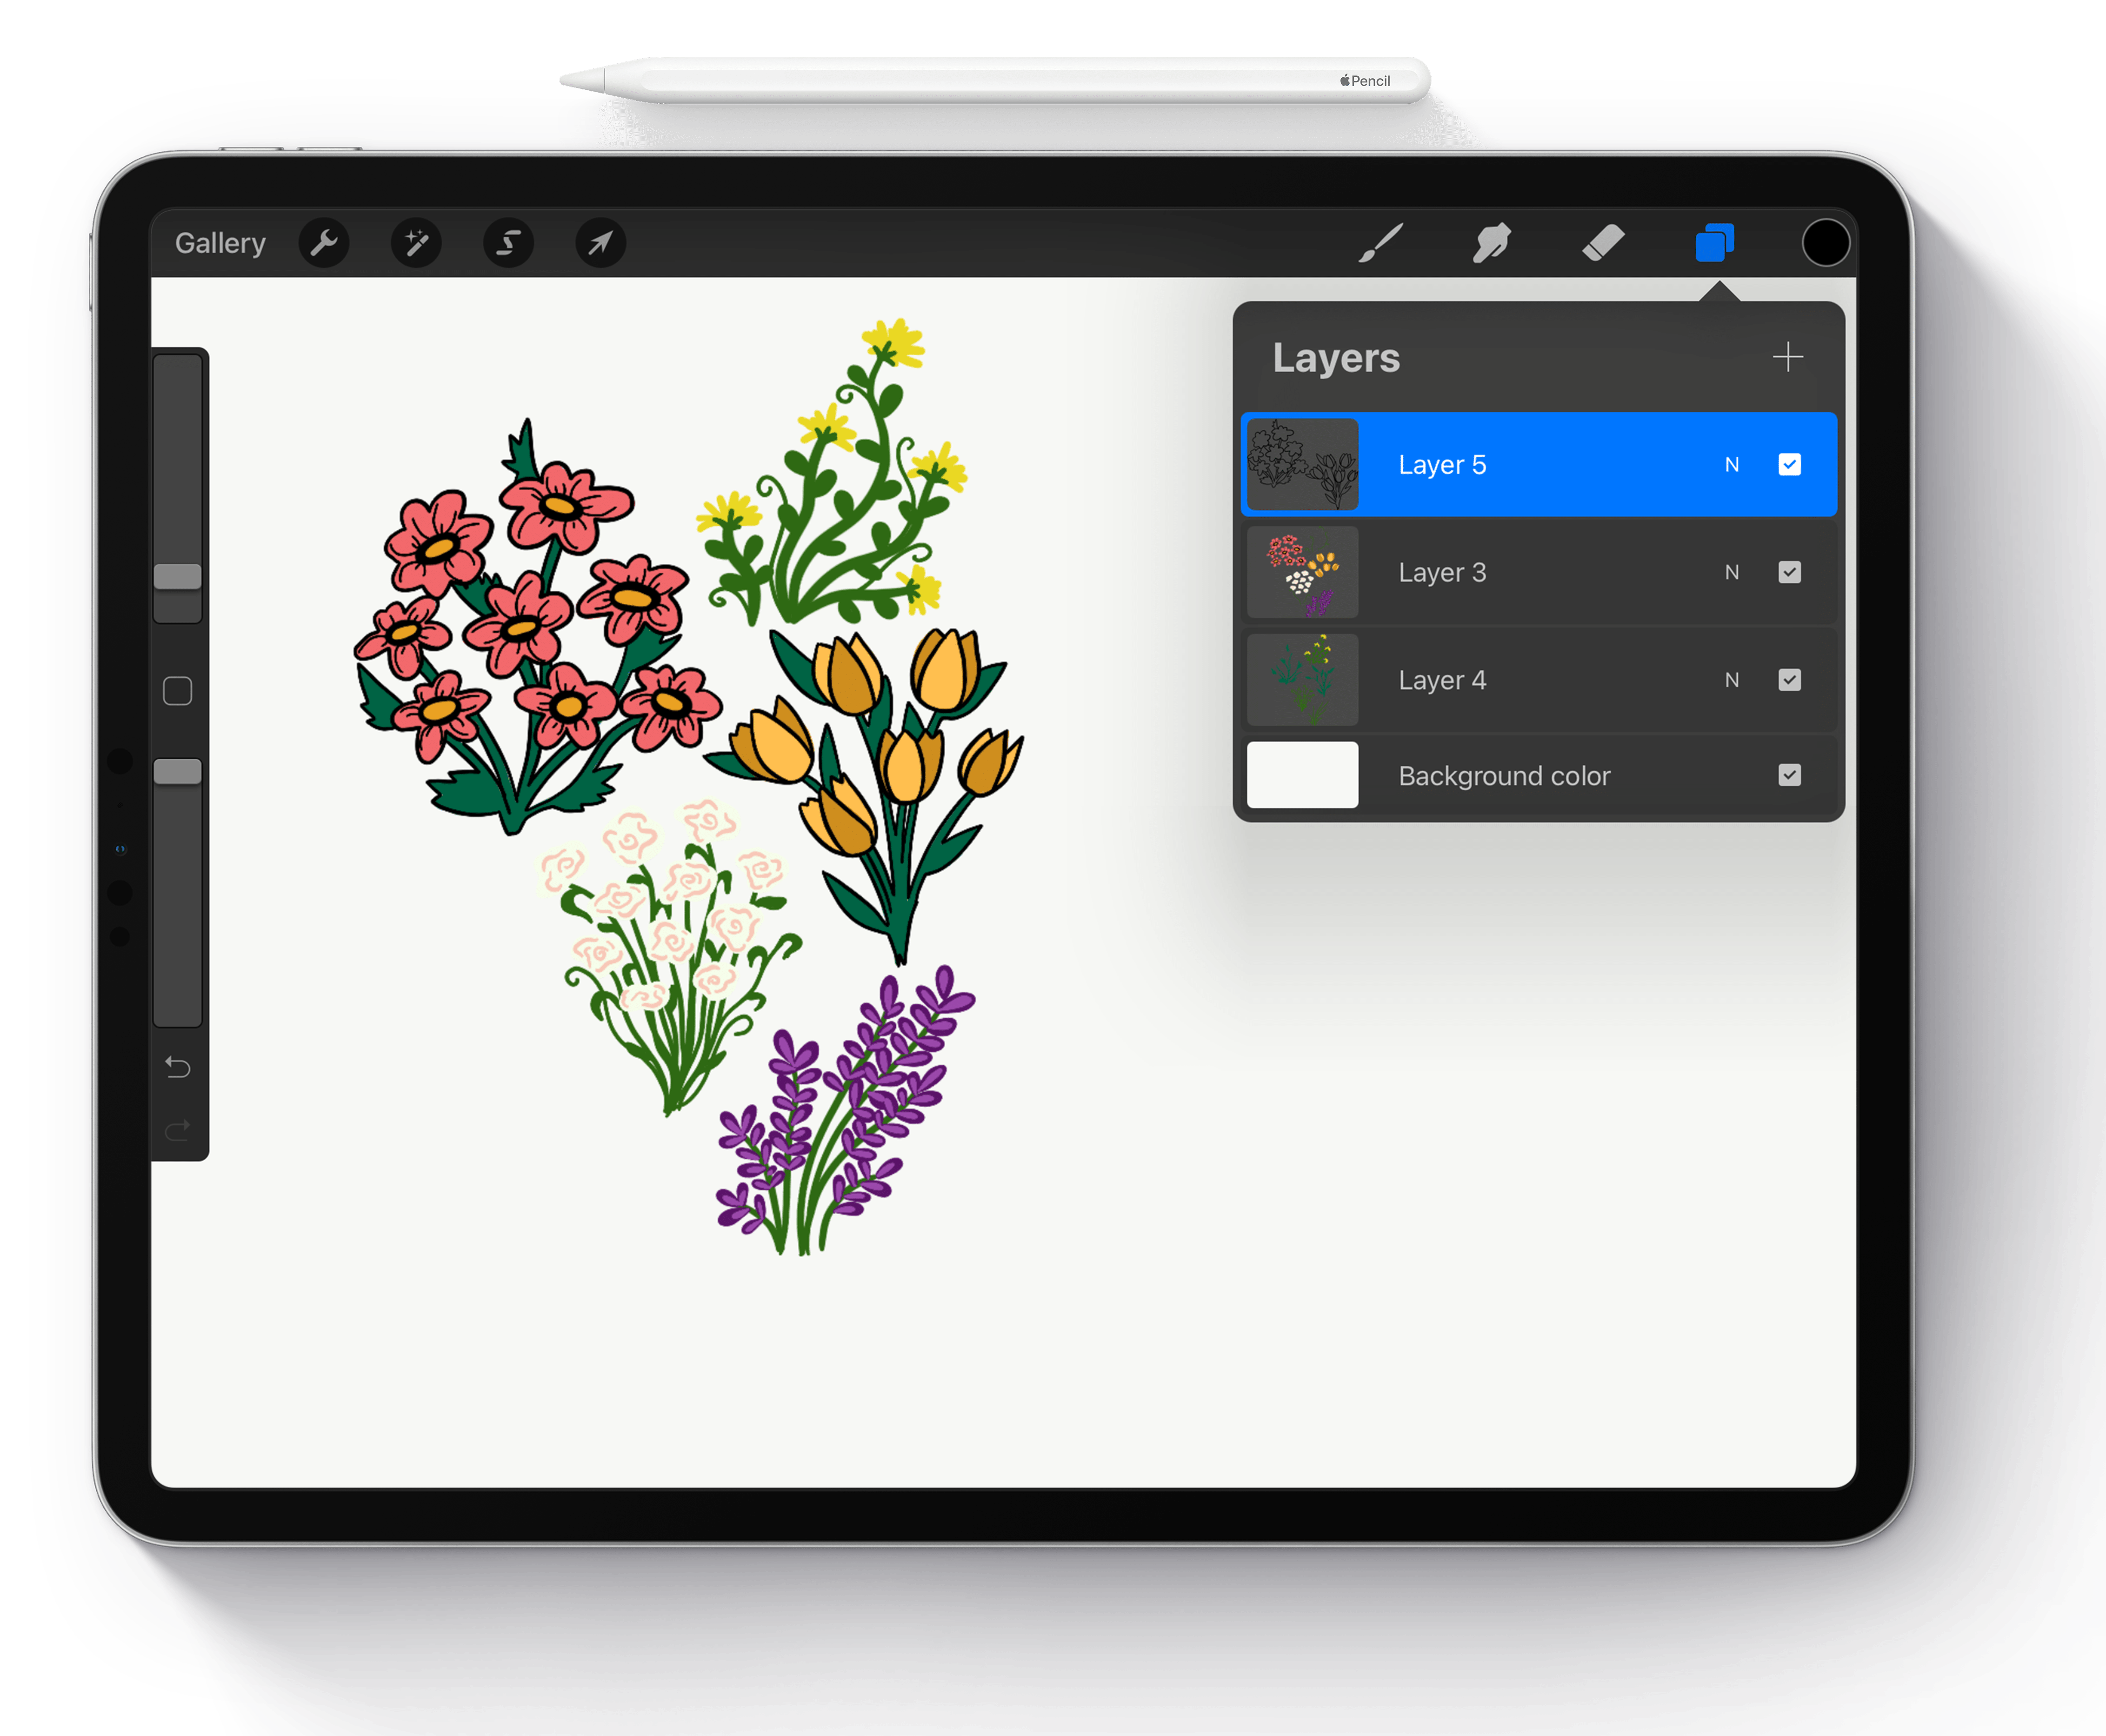
  1. Advanced Layers System

Procreate’s advanced layer system allows you to work with multiple layers in your artwork, making it easier to create complex compositions. Layers can be moved, duplicated, merged, and more, giving you complete control over your artwork. The layer system also makes it easy to create non-destructive edits, allowing you to make changes without affecting your original artwork.

  1. Time-Lapse Recording

Procreate’s time-lapse recording feature is a fun and engaging way to share your creative process with others. With this feature, you can record your artwork being created in real-time, and then share the time-lapse video with others. This is a great way to showcase your skills and to give others a glimpse into the creative process behind your work.

In conclusion, Procreate is a powerful and versatile digital art app that offers a wide range of features and tools for artists of all levels. Whether you’re a professional artist, hobbyist, or just starting out, Procreate has something to offer. So why not download the app today and start exploring all the amazing features and tools that Procreate has to offer!

Surface Pattern Design: A Guide to Creating Beautiful, Repeatable Textile Designs

Surface pattern design is the art of creating repeating patterns for textiles, wallpaper, wrapping paper, and other products. These patterns can range from simple geometric shapes to complex illustrations and can be used to add visual interest and texture to a variety of products.

The process of creating a surface pattern design typically begins with a concept or inspiration. This could be anything from a particular color scheme to a botanical illustration. From there, the designer will sketch out their ideas and refine the concept until they have a clear vision for the final design.

Once the concept is solidified, the designer will then create a repeatable pattern by arranging the design elements in a way that allows for seamless repetition. This process can be done by hand or with the aid of digital design software such as Adobe Illustrator or Procreate.

When creating a surface pattern design, it’s important to consider color, scale, and balance. Choosing the right color palette can greatly impact the overall look and feel of the pattern, while considering scale will ensure that the design elements are proportionate and visually appealing. Balance is also key, as a well-balanced pattern will look harmonious and professional.

It’s also important to think about the intended use of the surface pattern design. For example, if the pattern is to be used on clothing, it may need to be scalable and flexible to accommodate different garment sizes. On the other hand, if the pattern is intended for wallpaper, it may need to be more detailed and intricate to hold up at larger sizes.

When creating surface pattern designs, it’s also important to consider the end product. Different printing techniques, such as screen printing or digital printing, will affect the final look of the design, so it’s important to keep this in mind and make adjustments as needed.

In conclusion, surface pattern design is a creative and rewarding field that allows designers to bring their ideas to life through the creation of beautiful, repeatable patterns. Whether you’re a seasoned designer or just starting out, the key to success is to have a clear concept, think about the intended use, and pay attention to details like color, scale, and balance. With practice and dedication, anyone can create stunning surface patterns that will add beauty and texture to a variety of products.

Digital Art: Explore Illustration

Digital illustration is big business these days. A quick look at roadside billboards, club flyers or magazine covers should be enough to convince anyone that the art of the digital designer has never been in higher demand, and its popularity just keeps on growing.

But defining exactly what digital illustration is proves tricky. We all know what the words mean, yet the myriad of ways in which illustration can be applied makes it one of the most versatile of the creative arts and as such, it’s pretty difficult to pin down.

With a strong creative vision and the right software, concepts can be articulated in limitless ways; each style opening new doors for expression. The one crucial skill that ties it all together is the need for some innate artistic ability. You don’t need to be a virtuoso with a pencil to be good at computer art, but there’s no doubt that most professional illustrators are proficient with traditional art techniques.

The basics of image structure are the same across mediums, after all, and with software increasingly able to mimic traditional drawing methods, the transition to digital has become almost seamless. Let’s take a closer look at the main branches of digital illustration and discover a little more about how the experts put them together.

Vector art

It’s no great accident that vector illustration is currently one of the trendiest and easily recognizable of the digital art disciplines. The signature flat colors and clean lines are easy to spot and quick to grab attention, which of course makes the style hugely popular with advertisers looking to catch the eye of potential consumers. In addition, their reduced color palettes and scalable technology means they are perfect when it comes to artwork for the Web.

Created with precision by manipulating Bezier paths, the mechanics of vectors are based on mathematic principles that make them infinitely scalable without suffering degradation. This trait is extremely attractive to illustrators because it means images can be shrunk to a stamp or stretched to a billboard, without having to be redone. Paths are also easy to edit at a later stage, making vector images quick to tweak and rearrange if need be.

Vector shapes are often produced with photographs or hand drawn scans as templates, digitally tracing as much of the outline and detail as needed. Programs such as Flash can even create vectors automatically by tracing over photographic or pre sketched material, allowing picture elements to be created quickly and with little effort. However, the real artistry comes when choosing which elements to take to the digital image, and knowing how to color and arrange the final illustration.

Keeping up to date is crucial and, since digital artists typically spend hours in front of a screen involved in their masterpieces, it’s all too easy to become isolated from what’s going on around you. Styles ace constantly changing and trends can come and go at great speed, so keeping your finger on the industry pulse is vital. Not only does it make good commercial sense, but it can also act as a rich muse from which to draw ideas

Mixing media

While vector art focuses on clean shapes, simple forms and bold chunks of color, other digital illustration techniques take things in the opposite direction. Since the arrival of Photoshop in 1990, artists have been able to digitally manipulate photographic material and combine it with other visual ingredients, and when layers arrived with Photoshop 3.0 five years later, the stage was set for a new form of digital image. In 1995, digital photo illustration was born.

Based on the traditional method of using scissors and glue to cut and paste photos and artwork together in new arrangements, it’s a technique that has always been popular with children but has now become the favored strategy of many an adult illustrator. This is primarily due to Photoshop’s specialized, yet accessible and intuitive, tool set, but also reflects the success the strategy can have when attempting to convey a complicated collection of ideas.

Sketching toons

While everyone knows that Photoshop is the king of detailed mixed media illustration, less well known is the fact that it’s also astonishingly good at producing line and comic style artwork. Deftly sidestepping the need to use intricate filters and effects, the hand drawn, hand colored look is gaining favor with artists and art directors alike.

Because of the time saving tools that Photoshop offers, professional comic book artists are beginning to use the software to color their hand drawn sketches and are taking digital art into previously unexplored areas. Using a mixture of both hand drawn and digital painting, new styles are surfacing that are making a massive impact on the established illustration industry.

Realer than real?

But for many artists, the Holy Grail of computer art is realism. Recent advances in graphics technology have enabled software developers to accurately simulate real world drawing and painting tools by modelling how inks, chalks, oils and paints behave when they are applied to different surfaces. Using random particles to create natural looking strokes on simulated materials, you can now produce painted images that are all but indistinguishable from their hand made equivalents.

Since you can also grab a graphics tablet and paint directly onto your digital canvas, digital painting is less a description of an illustration style and more a literal possibility. As well as further mimicking the traditional within the digital arena, it’s also easy to pick up and get started. To this end, having some experience with real world painting is a definite advantage.

Because the technology behind natural media is so intricate, there are only a handful of programs that can actually achieve believable results. One of the most specialized is Corel Painter, which takes the possibilities to extremes by providing an array of simulated traditional drawing and painting tools. It even goes so far as to model the way that watercolor Paints behave when wet, with drips, runs and splashes. However, with some crafty brush creation and expert manipulation of layers, equally exciting effects can be replicated in your humble copy of Photoshop.

Pixel power

But although illustration software is advancing, it would be a mistake to think that the industry is focusing purely on pushing the undiscovered boundaries of digital imaging. In among the simulated paintings, clean vectors and intricate photo collages, a resurgence of old school pixel techniques is proudly celebrating the humble beginnings of computer art.

Pixel illustration is arguably where the whole digital illustration shebang began, back in the days when computer screens could only display a small number of colors at a low resolution. But, like so many limitations, this situation forced creativity and produced a unique style that’s now being snapped up in an industry that’s constantly on the lookout for something different.

Because low resolutions mean large pixel sizes, pixel art uses geometric rules that ensure perspectives are correctly maintained. A by product of this is the familiar isometric view that’s so common in this style of illustration, yet it does lend itself surprisingly well to conceptual art.

Pixel art continues to gain momentum, with increasing numbers of advertising and editorial commissioners looking to capitalize on its retro style designs. The bold use of color and scrutinizing detail also make it ideal for clients wishing to attract close attention and its popularity shows no signs of slowing.

Make it yours

With so many creative styles to work with, there are many entry points into the world of digital illustration. If you already own an imaging package, then you’ve got all the tools you need to get started. The disciplines we’ve delved into cover the majority of styles that are suited to computer art, but who knows what some hot new illustrator will come up with tomorrow. The range of software available combined with the sheer diversity of human experience, means that there is unlimited opportunity for individual expression.

So if you think you could be the next big thing then don’t delay because, whatever your style, now is your chance. The hipness of digital illustration is just beginning to break into the consciousness of the mainstream and there’s never been a better time to explore your creative potential.

Article Source: https://EzineArticles.com/expert/Rich_Goldman/60822

Article Source: http://EzineArticles.com/356907
10 Quick Tips on Drawing

Drawing is defined as the action of making marks on any surface with any mark-making material. It is clear, by this definition, that anyone can draw. If you can write your name, well then- you can draw. Now that we’ve established that, we all know that some of us can draw better than others. Becoming skilled at drawing requires several factors coming together. Some of these factors include desire, instruction, practice, time, and more practice. I decided to put together this list of quick tips on drawing so that you can immediately see results in your drawing abilities. This list of tips on drawing is not a “catch all” formula for drawing. They are purely just some tips that I have picked up along the way that have helped me in my drawing.

1. Drawing is a Skill- This means that drawing is not some magical activity that some people are born with the ability to do. A skill is something that can be taught and most importantly-learned. If you want to draw, draw better, or draw as a professional- you can. Anyone can become skilled at drawing. Don’t ever say, “I can’t draw.”

2. Drawing is At Least 50% Observation- Drawing is about seeing. Have you ever taken a photo of something without pointing the camera at it? Of course you haven’t. Yet so many people think they can draw well without looking at an object. Then they become disappointed that their drawings don’t look representational. You must look at objects in order to draw them. In fact, you need to look at objects a lot in order to draw them. I suggest that the amount of time you should spend looking at your object should be half the time it takes to complete the drawing. Drawing is at least 50% observation. If you want to draw an elephant, then look at an elephant. Really study it. Understand why you see it that way, then draw it. Everyone knows that one way to cheat on a test is to look at someone else’s paper. When you draw, look at your object- the answers are there. Just put them on your paper.

3. Use Resources- This one is related to #2. Gather photos or better yet take photos of objects if you can’t draw them in person. Some people may forsake me for this one. It’s just not possible to draw everything from life. So when you can’t be in the African Savannah to draw that lion, use a photo or three.

4. Look for Basic Shapes- Everything in the world can be simplified into basic shapes. When you are studying your subject, try to pick out the basic shapes that make up the over all shape. Usually these shapes are pretty easy to draw. Draw the shapes then draw the contours (outlines). ( This tip will help you with your speed as well.)

5. Good Drawings Have a Full Range of Value- Value is the darkness or lightness of a color. So value is about light. We can’t see without light, therefore we see things because of value. It’s not about color.(Although color is important too.) Make a value scale and then use it. Make sure that your drawing has a full range of value. (i.e. All of the values on your value scale.) You define the light source through your use of value.

6. Use Line Quality- Line quality is the thickness or thinness of a line. If your drawing is a line drawing, you need to consider line quality. Draw your lines thicker in some areas and thinner in other areas. This will add interest to your drawing as well as variety.

7. Stay Consistent with Your Style- Make sure that you start and finish your drawings with the same style. If you start your drawing loose and gestural, kept it that way. If your drawing begins tight and precise, finish it that way. Make sure the drawing looks like the same artist drew everything on the surface. This will insure that your drawing is unified and harmonious.

8. Know your Medium- Make sure that you understand the correct way to use the medium that you are using for your drawing. It’s fine to experiment, but knowing and understanding your limitations with a medium goes a long way.

9. Loosen Up- Drawing doesn’t have to be stiff. In fact, it shouldn’t be. For example, when you are trying to define the contour of an object, draw several light lines. You have a better chance of “finding” the right line when you draw several of them. (You have a better chance of winning the lottery if you buy several tickets instead of just one.) Try holding the pencil differently than how you hold it when you write. Draw with your shoulder instead of your wrist by moving your whole arm when you make a mark.

10. Practice, Practice, Practice, and then Practice- This is the best tip that there is. You must practice. This is true of any skill. Keep a sketchbook and draw literally everything that you see. Draw everyday. When you can’t draw, look at objects and imagine how you would draw them. What shapes are there? What values are there? Where is the light source? What medium would I use? Drawing can take place between your ears.

Article Source: http://EzineArticles.com/4256457

OH HEY

looking for something?

© 2019-2023 Amanda McCarty Design. All Rights Reserved.